 Lime and Walls
Old houses showcase remarkable diversity, using materials like brick, stone, flint, wattle and daub, and cob to create such areas as Lime Render internal plaster finishes, etc. These structures, crafted with various techniques, offer a unique patina and texture that, indeed, improve with age. They stand as a testament to the craftsmanship and resourcefulness of past generations, utilizing locally available materials. In regions with abundant stone, builders commonly used it; where stone was scarce, earth became the primary material, and timber framing thrived in forested areas. Thus, this use of local resources strongly connected buildings to their geographic surroundings.
Traditionally, craftsmen maintained and repaired walls using similar materials and methods, ensuring continuity in construction. This practice inherently included breathability. However, the Industrial Revolution changed everything. Railways transported mass-produced materials like bricks nationwide. Consequently, by the late 19th century, cement-based mortars and renders began replacing traditional methods. The interwar period saw extensive experimental building, and by the 1950s, modern cavity construction largely replaced the solid, breathable walls of the past. Today, modern and historical buildings coexist, but their repair techniques and materials remain incompatible.
Some benefits of Lime Render Can Be found Here
The use of lime in period walls can assist with limiting condensation events
Lime
In 1824, inventors created cement for civil engineering projects. By the early 1900s, builders began using it in domestic construction, although lime mortars remained common in traditional solid brick walls. After World War II, the demand for rapid construction led to widespread adoption of cement-based mortars, causing traditional lime mortars & lime renders to nearly vanish by the 1950s.
Early mortars and lime renders differed significantly, often made from earth dug from the ground and used in rubble-stone walls. These earth mortars filled spaces between stones, with lime-based mortars applied to the outer face for weather resistance. To differentiate lime from cement mortars, crumble a small piece between your fingers; lime crumbles easily due to its weaker bonds, while cement stays solid. A penknife test can also help: the blade penetrates lime mortar but not cement.
Lime originates from limestone, one of Earth’s most abundant materials, and exists in two types: non-hydraulic and hydraulic.
Hydraulic & Non-Hydraulic Limes
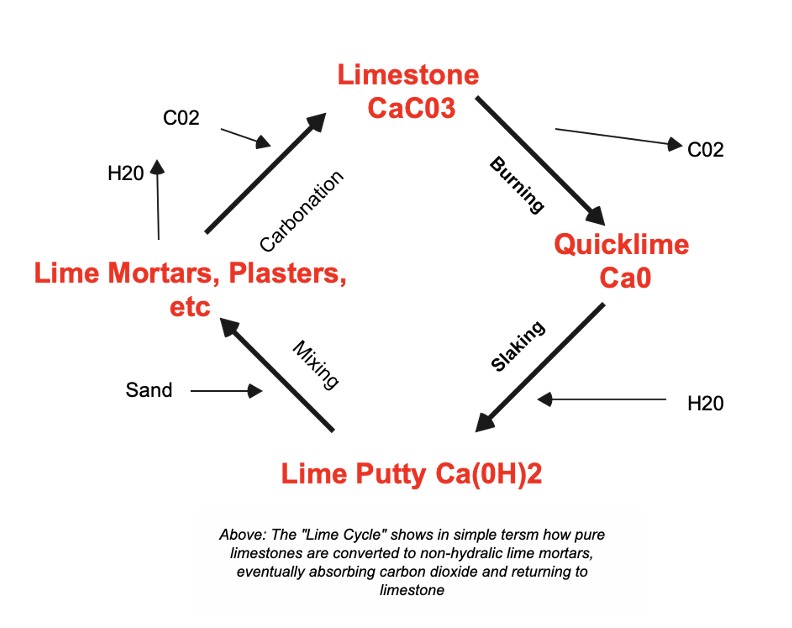
Non-Hydraulic Lime: Producers create non-hydraulic lime from pure limestone, transforming it into quicklime through kiln burning, then slaking it with water to form lime putty. Mixed with sand, it creates mortars and plasters. Non-hydraulic lime breathes and flexes, making it ideal for soft, porous materials. It cures by absorbing carbon dioxide, transforming back into calcium carbonate, a stable material that lasts indefinitely in a sealed container.
Hydraulic Lime: Made from limestone with natural impurities, hydraulic lime comes in powder form and sets upon contact with water. It suits damp or exposed situations requiring higher compressive strength or quicker setting. Hydraulic lime excels in new brick or stonework. Available in various strengths (NHL 2, NHL 3.5, NHL 5), the number indicates compressive strength. Higher numbers mean less flexibility and breathability.
Hydrated or ‘Bagged Lime’: Non-hydraulic lime also appears in powdered form, known as hydrated lime. Sold as an additive for cement mixes, it enhances plasticity and workability. Soaking it forms lime putty, but if not fresh, its quality remains inconsistent. Therefore, it is not recommended as a substitute for slaked lime putty due to the risk of failure.
Lime Renders & Mortars
Selecting the correct lime type is crucial. For new brick or stonework, use a weak hydraulic lime, mixing it similarly to cement with a ratio of about three parts sand to one part lime. For repointing soft bricks and stones, prefer non-hydraulic putty mortars for their ease of application and breathability. Repointing mortars should be relatively stiff and can be mixed by hand for small quantities.

So what lime should i use? Well the table below gives an idea of type in certain situations, but tghis should not be seen as a reason for not using tradesmen with experience with apply lime.
Knowledge and skill are both required when working with this timeless material and both should be treated with the same respect.
Choosing the Right Lime. | ||
|---|---|---|
With a wide variety of limes available, it is possible to find a suitable mortar or render for any situation without resorting to the use of cement. This chart gives an indication of the most appropriate choices. | ||
| HARD BRICK OR STONE | Sheltered Location | NHL 2 or 3.5 |
| Exposed Location | NHL 3.5 or 5 | |
| SOFT BRICK OR STONE | Sheltered Location | Lime Putty |
| Exposed Location | NHL 2 or 3.5 | |
| COB, STRAW BALE, TIMBER FRAME | Sheltered Location | Lime Putty |
| Exposed Location | Lime Putty | |
| OTHER SITUATIONS | High Level, e.g. bedding ridge tiles, flaunching and mortar fillets, horizontal surfaces | NHL 5 |
| Below Ground Works, footings, renderings or pointing to cellars, retaining walls etc. | NHL 3.5 or 5 |
Safety Precaution
- Lime is alkaline and poses a hazard to eyes.
- Therefore, always wear goggles and keep clean water and eye wash available.
- Use a flask of lukewarm water for emergency eye washing when working on scaffolds.
- Avoid inhaling powdered lime; use a quality face mask or hold your breath when opening the bag.
- While brief skin contact generally causes no harm, prolonged exposure dries skin and causes lime burns.
- Use tight-fitting surgical gloves to protect hands and wash hands thoroughly after using lime.
Why not check out our other posts Here


